Jac Vapour has been in the vaping game since 2010 and all their hardware is designed and engineered in the UK, I’ve heard of Jac Vapour over the years but I never got around to trying one of their devices until recently, the Series-B DNA 75W simply blew my mind from the minute I unpacked the device to using it everyday as my daily driver for vaping, frankly! if I’d of known how good their products were I could well of saved myself a lot of money over the last few years.
I have some amazing mods in my collection of vape equipment, some of them work good straight out of the box, others need a bit of tinkering to get the best use from them, but the Series-B DNA 75W from Jac Vapour was and is just a perfect device, from the minute I held the solid packaging to the touch of the rubberized tactile coating of the device and right through to using the Series-B DNA 75W everyday for all my vaping needs I felt quality everywhere and I knew I was vaping with a piece of quality hardware, this device simply is “class & beauty personified” and that is coming from someone who has some devices in his collection that cost ?400 plus, for those of you looking for a solid vape device that covers all the vaping styles in a small, powerful and classy profile or if you are looking to upgrade your gen 1 device to a generation 2 device that could last you a life time, then I would ask you to look at the Series-B DNA 75W from Jac Vapour, it may just be the best vaping decision you make since deciding to quit tobacco.
Generation 1 devices are simply the device that got you to give up tobacco cigarettes in the first place, most have a small pen styled battery and atomizer that is not hugely powerful but it does the job of giving you that nic hit to get you off the fags, some vapours choose to stay with a gen 1 device as they are not comfortable with upgrading, or they are not happy to take the next step in their vaping due to the unknown, or they would rather keep buying gen 1 products and getting fed up of short battery life and they would probably end up back on tobacco, others do want to move up whether it be to try temperature control or just to have the power to go a few days on a battery rather than having to recharge a Gen 1 device every night, there are many reasons vapers do choose to upgrade so hopefully you may just be one of those gen 2 adopters that wants to improve the quality of their vaping or try a new style of vaping.
So what is the Jac Vapour Series-B DNA 75W all about? Designed by JAC in the UK, and marrying their own exceptional design with Evolv’s industry-leading DNA75 chip, the SERIES-B DNA 75W packs plenty of punch in an exceptional good looking and compact device, the wattage and temperature control box mod is for those who demand more from their vape and vaping style but the DNA board from Evolv has the ability to offer you a more satisfying and consistent vape than most Gen 2 devices do on the market.
The Features of the SERIES-B DNA 75W:
Stylish and compact design
The smallest DNA75 mod available
Dimensions ? 88mm x 22mm x 35mm
Dual layer finish for better durability
Up to 75W of power
Max temperature of 600F for temp control
Spring loaded positive 510 connector
Variable wattage and temperature control modes
USB on board charging and pass thru
Electroplated magnetic battery cover
0.91? OLED display
Advanced safety features
Loads of customisation possible via Evolv’s EScribe software
6 month UK held warranty
The very high quality construction with advanced safety features make this SERIES-B DNA 75W a supremely reliable device and with Evolv’s DNA75 chip on board means you will get unparalleled performance.
Whether you’re in it for the clouds or just looking for a trusty daily carry and go device then this is the device you need, the box includes the SERIES-B DNA 75W box mod a USB charging lead a Manual and the 6 month warranty so all you would also need to purchase is an 18650 battery and you will have what I consider to be the best generation 2 mod available today on the planet for form factor, style and use and worked flawlessly…… “It simply is that good and I’m blown away”.
Any of your 510 threaded tanks will fit on to this device so no need to go buying a new tank at all, so if you have a favourite tank simply screw it on top and vape away, I am currently using the Innokin iSub A mini tank in black on my Jac Vapour SERIES-B DNA 75W and it looks fantastic and works effortlessly but I have also tried tanks from Kanger, Aspire and Smok and all the coils work so nice with the DNA 75 chip, it delivers about the smoothest vape I’ve had from a mod.
Being an Evolv DNA board in the SERIES-B DNA you have access to fully accessible firmware so your device can be kept up to date and have the settings of the device update in the future.
Vapour-Shack com has the Jac Vapour Series-B DNA 75W for sale online or call in to the shop at Ford Green Mill, Ford Green Road, Stoke-on-Trent ST6 1NG where a member of staff can show you the device in person, all that’s left to decide is, are you a Gen 1 vaper or are you a Gen 2 next level type of vaper?
I’m an experienced vaper and a kit like the Innokin Endura T20 is nothing that I would be interested in purchasing for myself, However, we owe it to the many tobacco smokers out there to know about and inform them of this device and to be able to give those smokers a real solution for quitting tobacco once and for all.
If you are a vaper and have managed to quit tobacco then you know what worked for you, but what you used may now be outdated, so when a great new kit comes on the market that has the ability to act as a replacement for someone’s tobacco addiction and you have the chance to tell them about a kit that would probably suit them and help them then you have to be able to give them concise facts about a product that could really help them quit tobacco.
The Innokin Endura T20 is that kit, it’s a fantastic mouth to lung vaping style kit made by Innokin so the quality is going to be second to none, The popular T18 and T22 kits were great but with the T20 we have a 100% fully TPD compliment kit giving us a great little 2ml tank and a choice of battery with 1000mAh and 1500mAh being available.
I’m going to start with something I have never seen before on an Innokin device and that is the protective lid that covers the mouth piece, this looks unique, a simple top that guards the mouth piece of the device that can simply be removed when you want a vape and can be attached to the base of the device for safe keeping, ingenious.
In the box you will get…
The Innokin Endura T20 battery
The Innokin T20 Prism Tank
A 1.5ohm Coil
A USB Charging Cable
A User Manual
Some Innokin Stickers
A couple of Spare drip tips
Some Spare O Rings
Setting up the device is a breeze and there is only one way the coil can fit in to the tank as always with Innokin, the kit battery size depends on which kit you choose but the battery
will either be 1000 or 1500mAh in size with the latter being a little longer, and a choice of colours to choose from Red, Black, Blue and Silver, all colours have a metallic style look, and you can also use this device as a pass-through while charging which is also a big plus.
The Innokin T20 Kit is what I would describe as a pen style device with a simplistic use for any vaping newcomer, and it’s a device that does not weigh all that much so will be able to be carried in a shirt or blouse pocket, just charge it up, fill with eliquid and off you go.
Filling the tank is a breeze to do and you simply only have to press the button three times to unlock the Innokin T20 and then press the button to fire the device, the draw on the kit is a good mouth to lung vape, direct lung inhales are not meant for this T20 Kit, this is primarily a MTL kit aimed squarely at the new vaper, but one thing that really amazes me with Innokin, the safety that they can build in to their devices as standard, we currently have in the Innokin T20 Overheat protection, Over charge protection, Short circuit warning, Over discharge protection, Low voltage warning and we get a 15 second cut-off.
All in all this is a kit that Innokin should be proud of and personally I think a new vaper would also be proud of this kit, it simply works and does work well.
vapour-shack.com has the Innokin Endura T20 Kits in stock, 1000mAh Here and the 1500mAh Here Remember! as an all ready experienced vaper, it is up to you to supply info about how this kind of kit and device could help all your tobacco smoking friends, the ease of use and the fantastic vape that this kit gives is so worth you trying to get family and friends away from tobacco for good and this kit really is good enough to do it.
There are many parts that make up the theory of tank air flow and why we need it and use it, I am going to try to help you understand the processes of air flow on e-liquid in a tank as this is what is used by most of us experienced?vapers these days.
The first process to using a tank is that your e-liquid needs to get to the coil or coils depending on what coil head or build you have installed in your tank, but to the most part tanks tend to use juice inlet ports that allows the e-liquid to pool around the first part of cotton it comes too which then allows the liquid to saturate through the entire coil and wick system.
The next process is that when we press the button to make a live contact with the power source the coils begin to heat and this intern causes the e-liquid to vaporize which is being absorbed?by the cotton wicking material, then the final process is that through the inhalation process air is drawn over or past the coil allowing the vapour and coil to cool slightly as it heads towards your mouth, When you think about the process like this it actually only takes a fraction of time for this whole process to happen to give us the satisfaction we get from vaping.
In the early days of vaping we used to use cig-a-likes or e-cigs that were meant to mimic a traditional tobacco cigarette, so when you think about a real cigarette, you light the tobacco and when you inhaled you were pulling air past the lit and burning end of the cigarette which helped keep the tobacco alight and the smoke was drawn up the entire cigarette tube to your mouth where it became inhaled, so in a cig-a-like the process was similar and it was quite tight to inhale as the airflow was quite obstructed as it is in a traditional cigarette, some vapers like this type of tight draw and are usually called mouth to lung vapers as the draw is tighter.
Now when it comes to something like sub ohm vaping these days?we have the ability most of the time to alter this air flow to allow more?air to pass the coils creating more vapour which can give the vaper a totally different experience depending on how you use the airflow, but there is a down side to lots of air and that is at the expense of flavour, as with a cigarette, the lesser airflow produced a flavour that we liked, that is why we all had our favourite brands and we stuck to them, the same thing kind of applies to e-cigs, if you get the airflow correct for the liquid then you find a favourite or an All Day Vape.
You can open up the airflow slots fully on your tank to allow maximum air pass through your coil and you will get maximum clouds and an ok flavour, or you can half open your airflow to allow a moderate amount of air to travel through your coil, you will still get a decent amount of clouds but you will increase the flavour, but closing the air flow even by half will give you a slightly tighter draw?from?your tank, so it’s a balance and well worth tweaking to get this correct.
Newer vapers tend not to know or understand much about airflow due to being new to vaping, and why should they? we’ve all been there, we just want to use a device that can mimic a tobacco cigarette so a tighter air flow is more preferable to a new vaper, however if the newer vaper knew about airflow then they might be able to up the performance of there device and tank to give themselves a much nicer vape with certain e-liquids that they are staring out with.
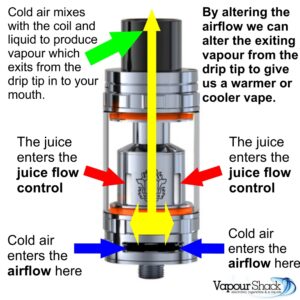
The airflow rings on a tank or an RDA are there for a reason, that reason is to allow us the user to alter the airflow to give us the best from the tank or RDA depending on the draw we want, the flavour we require from the e-liquid, and keeping the whole tank cooler or warmer and allowing the vapour to be warmer or cooler as it enters?the mouth.
We all need to experiment with airflow that is why nearly every tank has it these days, for an example….. I can use a tobacco e-liquid in an iSub tank on an MVP4 and I could have the airflow on the tank nearly closed, meaning that I get a nice tight flavourful warm draw very reminiscent to the cigarette I am?trying to mimic,?on the other hand….?I can use the same setup but this time?I am?using a fruit flavoured e-liquid but at an airflow?fully open?setting, the taste of the fruit is?cool?but?not very?strong in taste, so I choose to?close the airflow a little altering the?vape until I get the desired setting to allow me to taste the fruity taste?to?how I want to taste it and at the temperature that I want it to be, tweak, tweak, tweak, you cannot mess anything up here.
The guidelines of more airflow that I follow are thus: The theory of TANK AIR FLOW and why we NEED IT. I get a lot more vapour if the airflow is open.
I will get a less flavour or be able to tone a flavour down if too strong.
The lung hit I get will be better as I’m creating more vapour as I inhale.
I will get less of a throat hit as the vapour is weaker due to there being more air.
The guidelines of less airflow that I follow are thus: I get a less vapour if the airflow is more closed.
I will get a more flavour from the e-liquid.
The lung hit I get will be less as I’m creating less vapour as I inhale but I’m getting more satisfaction.
I will get more of a throat hit as the vapour is more intense due to there being less air.
I will have a much more warmer vape so certain flavours can taste better.
I can get that more cigarette type draw from this setup.
In Summary:
There are many things that can give us a pleasant experience when vaping, choosing the correct tasting e-liquid flavour to start with, choosing the correct tank that suits your device or mod your using?and the correct coil build in the tank?to suit the type of?juice your using will all help to bring out the best flavour, but learning how airflow can alter the flavour the?heat and the overall vaping?experience is the easiest thing we can tweak to really make your vaping experience a whole?lot better, do not be afraid to alter the simple setting of airflow?and see what suits you better, you may just find that the one e-liquid you like is much better with less airflow, but your all day vape excels with the airflow wide open, tweak, tweak, tweak and you could just find that sweet spot that vapours crave for. The theory of TANK AIR FLOW and why we NEED IT.
The theory of TANK AIR FLOW and why we NEED IT. (written by Jay) The theory of TANK AIR FLOW and why we NEED IT.
I occasionally suffer with blocked Sinus’s and if you’ve ever been sick, had a cold or the flu or even vapers tongue where you cannot even taste your preferred e-liquid flavour, then there is a simple answer, it may not be the answer you want to hear, but Menthol is a great flavour for Sickness, Colds, Flues & Vapers Tongue and?it is?truly a Menthol Medicine. Sick, Colds, Flues & Vapers Tongue, Menthol Medicine.
How many times have you been vaping your usual all day vape?e-liquid only to pick up your e-cig take a vape and think that doesn’t taste right? or not be able to taste your vape at all, you then realise the next day when your lying in your bed sipping cold and flu remedies, your trying to vape but not getting any flavour and thinking what is the use? well I can tell you that Menthol flavoured e-liquid could just be your best friend at these times.
Menthol is fast becoming the E-Juice of choice for that temporary relief from cold and flu symptoms for vapers, colds and flus can cause your sinus’s to become blocked and most of what we can taste comes from receptors in the nose and not always from the tongue as once thought, Menthol does a good job of temporarily easing the sinus cavities making us be able to breath a little easier, of coarse it is not actually doing anything but what it is doing is causing a cooling effect inside your sinus.
Now admittedly, I do not generally vape Menthol flavours of any kind for enjoyment, but on reflection I do use menthol quite a lot when my sinus’s play up, I tend to use just a standard menthol e-liquid but there are so many flavoured menthols out there, Storm Force by Cloudy Reef is one which is a powerful collision of menthol and mint and a spearmint after taste, there is also The Wise Guy by VaperCrew which is a blend of apple, red and white grape and cool ice menthol if you like menthol and fruit, fruit and menthol gives a nice refreshing flavour but I tend to prefer menthol on it’s own.
?
So Menthol may not be your e-liquid flavour of choice but even the dreaded vapers tongue will hit us all at some point, this is when our taste buds are just so use to our regular e-liquid flavour that we will have a day or two where we just cannot taste our all day vape, menthol is great for rebooting our taste buds, vape menthol for a day or two and then go back on to your own daily vape and you should be right as rain, it works for me and?I always keep a bottle of menthol in for these exact occasions.
So the next time you get Sick or have a Cold or the Flu, or?the dreaded Vapers Tongue pays you a visit, Menthol e-liquid is fantastic to keep in your vape cupboard for just these occasions.
Being a big fan of building my own coils in certain Tanks and RDA’s and owning an Innokin iSub S tank I was interested to see what the Innokin iSub RBA No Spill Coil System for iSub Tanks was all about, I very rarely use standard shop built coil heads anymore as I can build coils myself, but seeing how a small inexpensive RBA kit was being made by Innokin for it’s own tanks was very intriguing, I’ve even made a simple video showing how I used it.
In the Tin you get:
An iSub RBA Base
A Coil Spit Proof Cap for the base
A Pack of Organic Cotton
A Set of O-rings and Small Screws
A Ceramic Rod
A Blue Screwdriver
And 2 Prebuilt Micro Coils at around 0.5 ohms each
This iSub RBA is a small head to use to build a coil in, but having coiled a Kanger head years ago and that being very small, I found?that it is the best way to start in the world of self building your coils, if you can manage to build on a very small RBA deck then you will be able to coil anything else in the future which has a much larger deck.
The Innokin iSub RBA No Spill Coil System for iSub Tanks arrives in a nice aluminium tin with a sponge insert that has cut-outs for all the tools and pre built coils, looking at the RBA head you can clearly see how the coil is suppose to fit in, the coil will fit on to the red and black coil tool and slide in to the RBA head and sit in the two wick slots, the two legs or wires fit down and each go through a separate hole in the base of the RBA, one being the live and one being the negative, these two wires are then held in place with the included screws of which there are spares also and then?tightened up with the blue screw driver.
At this point you can snip off the excess leads and remove the red and black coil tool, leaving your coil in place, all that is left is to cut a strip of the included organic cotton and thread it through the holes and through the coil, trim of the ends and fit the head in to your preferred tank.
At this point I cannot stress enough about testing your coil resistance, this is most important, the 521 Coil Master Mini Tab I use in the video is a god send for testing, once the resistance is stable and giving a non fluctuating reading then you know you have the coil seated and connected properly, at this point you can then add your e-liquid to the tank, never fire the coil without e-liquid as you will burn the cotton.
All in all I found the process of using the Innokin iSub RBA No Spill Coil System for iSub Tanks Kit a pleasure to use, the tools have all been thought out well and they give you almost everything you could need apart from a resistance tester, however, if you are interested in getting in to building regularly then I would highly advise getting the Coil Master Kit as it really does supply everything a coil builder could possibly need to build and fit coils.
I hope you enjoy the little video, it is my very first build video and is a little rough around the edges, but as I always say, with experience comes quality, so hoping my second video will be much better and more informative for you all.
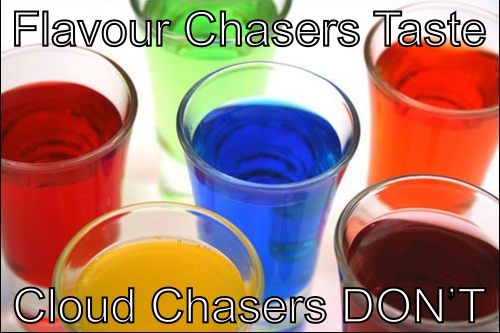
I’ve said it before and I’ll say it again, flavour over clouds is my ultimate goal as a vaper and over the years I’ve learnt a few tricks and tips on how to get the best from my e-liquid so please join me on a flavour chasers search for the perfect sweet spot, “I’ll try to help you get the best flavours from?your e-liquids“.
There is nothing wrong with blowing huge clouds of vapour and fogging out a room if that’s really what makes you happy as a vaper, but ask yourself? where is your flavour? if you want a huge, cloud aren’t you better off just using a straight vegetable glycerine on your coil and not bothering with flavoured e-liquids at all, build the biggest and best coil you can and insert fresh batteries in to your mech mod, use vegetable glycerine only with no propylene glycol, flavouring or nicotine and you should have the biggest cloud of vapour you will ever see, “I know cloud chasing is en vogue, but does it really satisfy”?
Some of us are after a bit more with our vaping, we are in the search for the ultimate flavour that our e-liquid can give us, we are after nice and strong vivid flavours and being able to find every flavour note within the e-liquid, clouds don’t really matter to us, sure a small cloud is fine, after all when we smoked we made a cloud but it didn’t block out the sun did it?
If you trawl the internet these days you will find ten websites based on cloud chasing and only one website about flavour chasing, that is because cloud chasing setups are easy, the bigger the better wins, but flavour chasing is all about tweaking what you already have and learning to make your equipment work to maximum effect to help perfect flavour from?the?e-liquid your using.
When you have your device or mod you need to make sure the battery level is at maximum, it’s no good to start tweaking settings to help get the best flavour if your mod is about to give up the ghost, now variable voltage and variable wattage devices are the flavour chasers best friend, this is because you can tweak heat and power settings to pickup certain flavour notes in an e-liquid, no e-liquid is made the same, some flavours will only come out at a certain temperature while other flavours will boil if the temperature is too high, also your coil resistance is a big factor, but with careful balance you can get a fully charged mod and a coil to work in harmony to give you the very best in flavour from an e-liquid.
When we start off looking for flavours in an e-liquid we are searching for the “Sweet Spot” or the optimum point, the trouble is that the sweet spot could be at very low wattage or low temperatures or it could be at very high temperatures or high wattage,?flavour could be tastier on a 1.8 ohm coil or more flavoursome on a 0.12 ohm stainless steel built coil, we just don’t know, but we can over time learn that a coconut flavour is more prominent at high heat builds and a pineapple flavour is more tasty at low wattage so if I put in a 0.3 ohm 28 gauge coil in an RDA and fire that at 12 watts, I should find that perfect Malibu flavour that the inventor was trying to recreate, it’s all about tweaking with flavour chasing, it’s not easy, but when you get it right you really get to taste the e-liquids just as the guy who invented it did, and that is a flavour chasers goal.
Flavour chasers now have a perfect weapon in the ultimate search for flavour and that is called Temperature Control, you see, the temperature of your coil is the over riding factor when it comes to hunting flavours, temperature control devices can limit?a coils maximum temperature, this makes it perfect for flavour chasing, finding the correct setting is simple, start low and adjust the temperature up as needed, this way the result will be a more consistent and flavoured vape.
Apart from temperature controlled devices there are a few other items in our arsenal that we can tweak to help improve flavours, air flow is a huge one, in the cloud chasing world having a huge airflow is very much needed, when maximum amounts of air hits the coil it will produce enormous clouds of vaper as the liquid starts to?heat on the coil and evaporates, but the downside to this maximum air?is that flavour is very much?diminished as you are having to really heat?the liquid to create these clouds, so doesn’t it make sense that to get flavour you need to close down airflow.
Closing down an airflow will create a dense and warm vapour that can travel up to the mouth and the taste buds, this warmer vapour carries much more flavour, so having an adjustable air flow on a tank or RDA? make this possible, but you have to be careful with this as getting the correct balance is very important, If the air flow holes are too closed you will have a poorer vapour production and the vapour may be a bit to hot, it’s like with the power of your device you need to start low and adjust the airflow setting until you get the ideal spot for you.
One of the other elements to note is that if you have a tank or an RDA and it comes with a wide chuff style drip tip, have you ever wondered why you get this chuff style tip? it is so that you can inhale lots of air?through the coil and bring out a ton of vapour in the form of clouds, but if you look in the spares bag you may see a 510 adapter that can be put in place of the chuff drip tip so you can use a normal narrower drip tip, this is there for the flavour chaser, use it, it is no good looking for flavour if the tank manufacturer only supplied the tank for cloud chasing, the 510 drip tip adapter is there to use for flavour chasing.
Have you heard of the sayings “Direct Lung Hit” and “Mouth To Lung”? well it tends to be true and especially in my opinion that “Mouth To Lung” is the preference for the flavour chaser, after all we are primarily after flavour, flavour is produced in the mouth and not in the lung, so Direct Lung is for larger coils which are more cloudy where the user can inhale direct and fill their lungs with vapour, and mouth to lung is for smaller coils, what I mean by this? the major thing is the bore of the atomiser or coil head and the leaning towards large bore coils give more airflow through the coil and will reduce flavour, so it may be better to choose a tank or an RDA that has a smaller more tighter coil, this type of coil is often classified as a mouth to lung coil meaning we take the vapour in to our mouth then inhale it in to our lungs much like we did when we smoked, when we vape this way the vapour sits on our palate in the mouth and absorbs flavour.
Mouth to lung devices i.e. tanks?are not very common as everything touts to the cloud chaser but more tanks that lean towards flavour chasing are appearing on the market so look out for them if you prefer flavour, we have had a few over the years and one that does spring to mind that was readily available?was the Aspire Nautilus tank, it was a great flavour chasing tank as it was ideal for mouth to lung, and I think the newer style Nautilus which is just hitting the market in early 2017 will be more of the same, the other option is an RDA or an RBA head for your own tank where you can build a coil your own way to chase that flavour, I will be doing a coil building video soon for Vapour Shack that will show you a couple of flavour chasing builds for?a Tank and RDA and an RBA head.
Most flavour chasing vapers like myself do use a rebuildable atomizer or?an?RDA as this gives us the best experience for flavour. RDA’s are a lot more hands on as you need to build your own coil but it means we can tweak that coil to give the flavour we want, so if you are comfortable with making your own coils an RDA is your best tool to go for.
There is not a lot to say on the various wires or cottons that are available if you are a builder of coils like with an RDA, everyone tends to have their own preference and one is not really any better than the other, for me personally I always used Kanthal wire as did most builders, it’s easy to use and it holds it’s shape well and Kanthal comes in various gauges or thicknesses, the down side with Kanthal wire is that it is for wattage power only, I changed about two years ago from Kanthal builds?to using Stainless Steel wire in my builds?for one simple reason, stainless steel builds can be used in both wattage mode and temperature control modes, I find it no different to work with over Kanthal wire and I think it personally gives me a cleaner and more crisp taste, as for the wicking material, I have always used cotton apart from the days before cotton, we all used Silica wick (dreadful stuff),?Pro Cotton by Coil Master is my preferred brand for wicking all my self build coils, I just find it very easy to work with and it tears very easily.
When it comes to e-liquids I can offer a little advice here as I do mix my own DIY E-Liquid, VG (vegetable glycerine) verses PG (propylene glycol), VG is the killer when it comes to flavour chasing, VG has a natural sweetener in it which is known to dull concentrated flavourings but juice manufacturers use VG as it gives bigger clouds, PG on the other hand carries flavours very well but it is a lot thinner in viscosity and produces next to no clouds, that is why most flavour concentrates are ready mixed with PG, because it carries the flavour the best, now in general most standard e-liquids that you buy will have a standard mix of 70% VG and 30% PG this is because they want you to have some PG carrying some flavour, but the VG gives the thickness to the liquid allowing you to see a nice cloud when you vape it, so imagine the flavour you would get if it was the other way around and you had 70 % PG and only 30 % VG? well I can tell you, I made two batches of the same flavour up at both ratios, and yes, I got a little less clouds from the low VG juice but not enough to worry about but the flavour I got was much more pronounced, the trouble with PG is that if you use to much then it can give a rather hard throat hit which is less enjoyable, but at a blend of 50 % VG to 50 % PG everything is way better, I think this is why Juice manufactures are regularly tweaking their mixes to get them to give you a better flavour and throat hit, so if you see a 50% 50% blend then that would be the best to go for as a flavour chaser.
Another tip that I cannot stress enough is never use the same?coil for various different juices, If you pass a?blackcurrant menthol juice through a new coil and vape it then you will get a nice taste of Blackcurrant menthol, but if you then run out of?blackcurrant menthol and run your coil under the tap and then refill with Banoffe flavour e-liquid the banana is still going to have a slight hint of Menthol E-Liquid taste and that’s just disgusting, it’s like having a plate of fish and chips with salt and vinegar, eating it then having a nice vanilla ice cream for pudding off the same plate without washing it first, it’s disgusting, don’t do it! use a fresh coil for each liquid, if it means you have a few tanks on the go or a few RDA’s then so be it, it’s much better than tainting flavours.
The best way to go is If you use RDA’s or a rebuildable head you will only need to change your wick, take out the old wick, dry burn the coil and reinsert a new wick, it’s easy and only takes a minute or two and doing it with every change of flavour is more reliable.
I think I have given you an idea on how to improve your chances of tasting great flavoured e-liquid, follow just some of these tips and tricks and you will soon start tasting in a different way which might make you see that cloud chasing is just one style of vaping and there is an entirely other world out there called flavour chasing.
I look forward to hearing how you are getting on with flavour on the vapour shack Facebook page.